
啟動 cmder 出現 init.bat 不是內部或外部命令、可執行的程式或批次檔
2 月.24, 2020 in MIS

錯誤訊息如下:
‘”C:\cmder\vendor\conemu-maximus5..\init.bat”‘ 不是內部或外部命令、可執行的程式或批次檔。
檢查防毒軟體看到 init.bat 被 Avast 誤判而隔離了
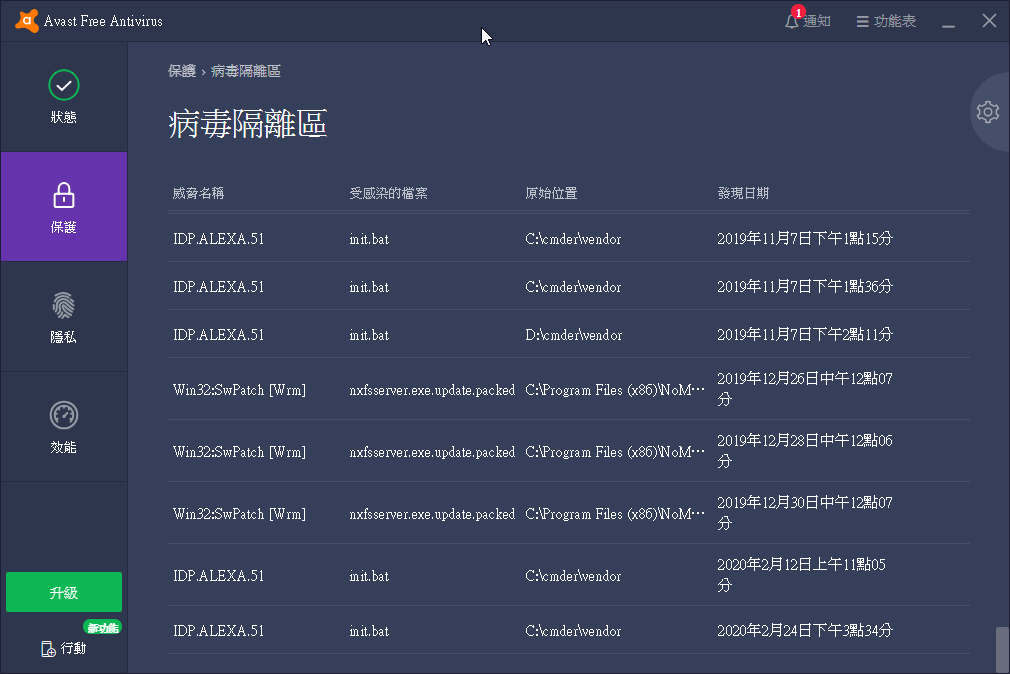
期望 Avast 改善很難,只好進設定將 cmder 目錄加到例外清單,然後再重新下載安裝 cmder 一次。
Tags: cmder
錯誤訊息如下:
‘”C:\cmder\vendor\conemu-maximus5..\init.bat”‘ 不是內部或外部命令、可執行的程式或批次檔。
檢查防毒軟體看到 init.bat 被 Avast 誤判而隔離了
期望 Avast 改善很難,只好進設定將 cmder 目錄加到例外清單,然後再重新下載安裝 cmder 一次。
Prometheus 的 node_exporter 在 syslog 會出現 連續 錯誤訊息
May 28 21:41:19 pve-1 node_exporter[1409]: time=”2019-05-28T21:41:19+08:00″ level=error msg=”error encoding and sending metric family: write tcp X.X.X.X:9100->Y.Y.Y.Y:53638: write: broken pipe\n” source=”log.go:172″
May 28 21:41:19 pve-1 node_exporter[1409]: time=”2019-05-28T21:41:19+08:00″ level=error msg=”error encoding and sending metric family: write tcp X.X.X.X:9100->Y.Y.Y.Y:53638: write: broken pipe\n” source=”log.go:172″
May 28 21:41:19 pve-1 node_exporter[1409]: time=”2019-05-28T21:41:19+08:00″ level=error msg=”error encoding and sending metric family: write tcp X.X.X.X:9100->Y.Y.Y.Y:53638: write: broken pipe\n” source=”log.go:172″
May 28 21:41:19 pve-1 node_exporter[1409]: time=”2019-05-28T21:41:19+08:00″ level=error msg=”error encoding and sending metric family: write tcp X.X.X.X:9100->Y.Y.Y.Y:53638: write: broken pipe\n” source=”log.go:172″
May 28 21:41:19 pve-1 node_exporter[1409]: time=”2019-05-28T21:41:19+08:00″ level=error msg=”error encoding and sending metric family: write tcp X.X.X.X:9100->Y.Y.Y.Y:53638: write: broken pipe\n” source=”log.go:172″
May 28 21:41:19 pve-1 node_exporter[1409]: 2019/05/28 21:41:19 http: multiple response.WriteHeader calls
這是因為調整 Prometheus server 的 job 設定,將 scrape_interval 與 scrape_timeout 兩個參數都設到 1s 後開始出現,看起來是 job 抓 metrics 的作業來不及跑完又執行所造成。改為 5s 後就沒出現了。
在執行 docker run 啟動容器有使用到 –restart=unless-stopped 參數,結果得到 docker: invalid restart policy unless-stopped. 的錯誤訊息。
請先用 docker version 確認版本,因為 unless stopped restart policy 是到 1.9.0 版才新加入。舊版 docker 環境可以改回用 always policy 繞過問題。
在 vagrant 啟動 CentOS 6 的 VM 時,忽然出現了無法掛載 /vagrant 目錄的錯誤訊息:
1 2 3 4 5 6 7 8 9 10 11 12 13 14 15 16 17 18 19 20 21 22 23 24 25 26 27 28 | $ vagrant up Bringing machine 'default' up with 'virtualbox' provider... ==> default: Checking if box 'chef/centos-6.6' is up to date... ==> default: Clearing any previously set forwarded ports... ==> default: Clearing any previously set network interfaces... ==> default: Preparing network interfaces based on configuration... default: Adapter 1: nat ==> default: Forwarding ports... default: 80 => 8080 (adapter 1) default: 22 => 2222 (adapter 1) ==> default: Booting VM... ==> default: Waiting for machine to boot. This may take a few minutes... default: SSH address: 127.0.0.1:2222 default: SSH username: vagrant default: SSH auth method: private key default: Warning: Connection timeout. Retrying... default: Warning: Remote connection disconnect. Retrying... default: Warning: Remote connection disconnect. Retrying... ==> default: Machine booted and ready! ==> default: Checking for guest additions in VM... ==> default: Mounting shared folders... default: /vagrant => /Users/bestlong/projects/vagrant_vms/chef-centos-66 Failed to mount folders in Linux guest. This is usually because the "vboxsf" file system is not available. Please verify that the guest additions are properly installed in the guest and can work properly. The command attempted was: mount -t vboxsf -o uid=<code>id -u vagrant |
,gid=
1 | getent group vagrant | cut -d: -f3 |
vagrant /vagrant
mount -t vboxsf -o uid=
1 | id -u vagrant |
,gid=
1 | id -g vagrant |
vagrant /vagrant
The error output from the last command was:
/sbin/mount.vboxsf: mounting failed with the error: No such device
這是因為在 Guest os 環境內有執行系統更新,因為更新的範圍有包含到 kernal 的部分,所以造成 VirtualBox 的系統工具程式就出問題了。
這時只需要重新安裝一次 VirtualBox Guest Additions kernel modules 應該就可以解決,首先要確認相關的套件都有安裝免得編譯失敗,請執行下列指令:
1 2 | [root@localhost ~]# yum update -y [root@localhost ~]# yum install kernel-devel-$(uname -r) kernel-headers-$(uname -r) dkms -y |
再來就是安裝 VirtualBox Guest Additions kernel modules
1 2 3 4 5 6 7 | [root@localhost ~]# /etc/init.d/vboxadd setup Removing existing VirtualBox DKMS kernel modules [ OK ] Removing existing VirtualBox non-DKMS kernel modules [ OK ] Building the VirtualBox Guest Additions kernel modules [ OK ] Doing non-kernel setup of the Guest Additions [ OK ] Starting the VirtualBox Guest Additions [ OK ] [root@localhost ~]# |
再來就可以重新啟動 Guest OS 確認啟動過程,應該就可以正常掛載 /vagrant 目錄了。
1 2 3 4 5 6 7 8 9 10 11 12 13 14 15 16 17 18 19 20 21 22 | $ vagrant reload ==> default: Attempting graceful shutdown of VM... ==> default: Checking if box 'chef/centos-6.6' is up to date... ==> default: Clearing any previously set forwarded ports... ==> default: Clearing any previously set network interfaces... ==> default: Preparing network interfaces based on configuration... default: Adapter 1: nat ==> default: Forwarding ports... default: 80 => 8080 (adapter 1) default: 22 => 2222 (adapter 1) ==> default: Booting VM... ==> default: Waiting for machine to boot. This may take a few minutes... default: SSH address: 127.0.0.1:2222 default: SSH username: vagrant default: SSH auth method: private key default: Warning: Connection timeout. Retrying... default: Warning: Remote connection disconnect. Retrying... ==> default: Machine booted and ready! ==> default: Checking for guest additions in VM... ==> default: Mounting shared folders... default: /vagrant => /Users/bestlong/projects/vagrant_vms/chef-centos-66 ==> default: Machine already provisioned. Run <code>vagrant provision |
or use the
1 | --provision |
==> default: to force provisioning. Provisioners marked to run always will still run.
參考資料
隨著地球越來越熱,而常年來放在家中的 Linux 主機不斷的熱力四射,總和攻擊能量已經累積到令人無法忽視的地步,開冷氣進行反攻可是會影響口袋的深度。
換新的電腦應該可以改善,但硬體成本起碼要數千元還要再加上 24H 不關機的每月電費起碼 NTD 三百起跳,再說有實體機器還是會有熱度,想一想還是決定租主機吧。因為在此主機上跑很多種系統與服務,所以需要找 VPS 才能擁有完整的管理權。
網路上很多專業部落客都建議使用 Linode 每月 $10 USD 起價。如果想要更低價的話還有另一個不錯的選擇就是 DigitalOcean 每月 $5 USD 起價,不過相對的規格就會小一些。實際的差異請參考官網,兩家都可以用小時計費。
因為是小站,所以就衝著 512MB RAM / 20GB SSD 每個月只要 5 USD 這麼便宜的特色,就先來用看看。可惜的是 DigitalOcean 沒提供試用時間,但是可以在網路上找一下優惠碼取得一定的使用金額來補償一下,要注意的是一個賬戶只有使用一次優惠碼的機會,我只有找到 10 美金的,所以各位就想辦法找到金額最高的就是了。
申請帳戶基本上就是完成註冊驗證流程提供身份資料與設定付款方式,付款可以用信用卡與 Paypal 兩種,不過有一個重點就是因為 DigitalOcean 目前的服務條款是不退款的,所以用 Paypal 預付時請注意一下。
再來就是要新增虛擬主機了,在 DigitalOcean 稱為 Droplet (水滴) 應該是與公司名稱相關,因為大海是由水滴所累積而成的,可見其雄心壯志。
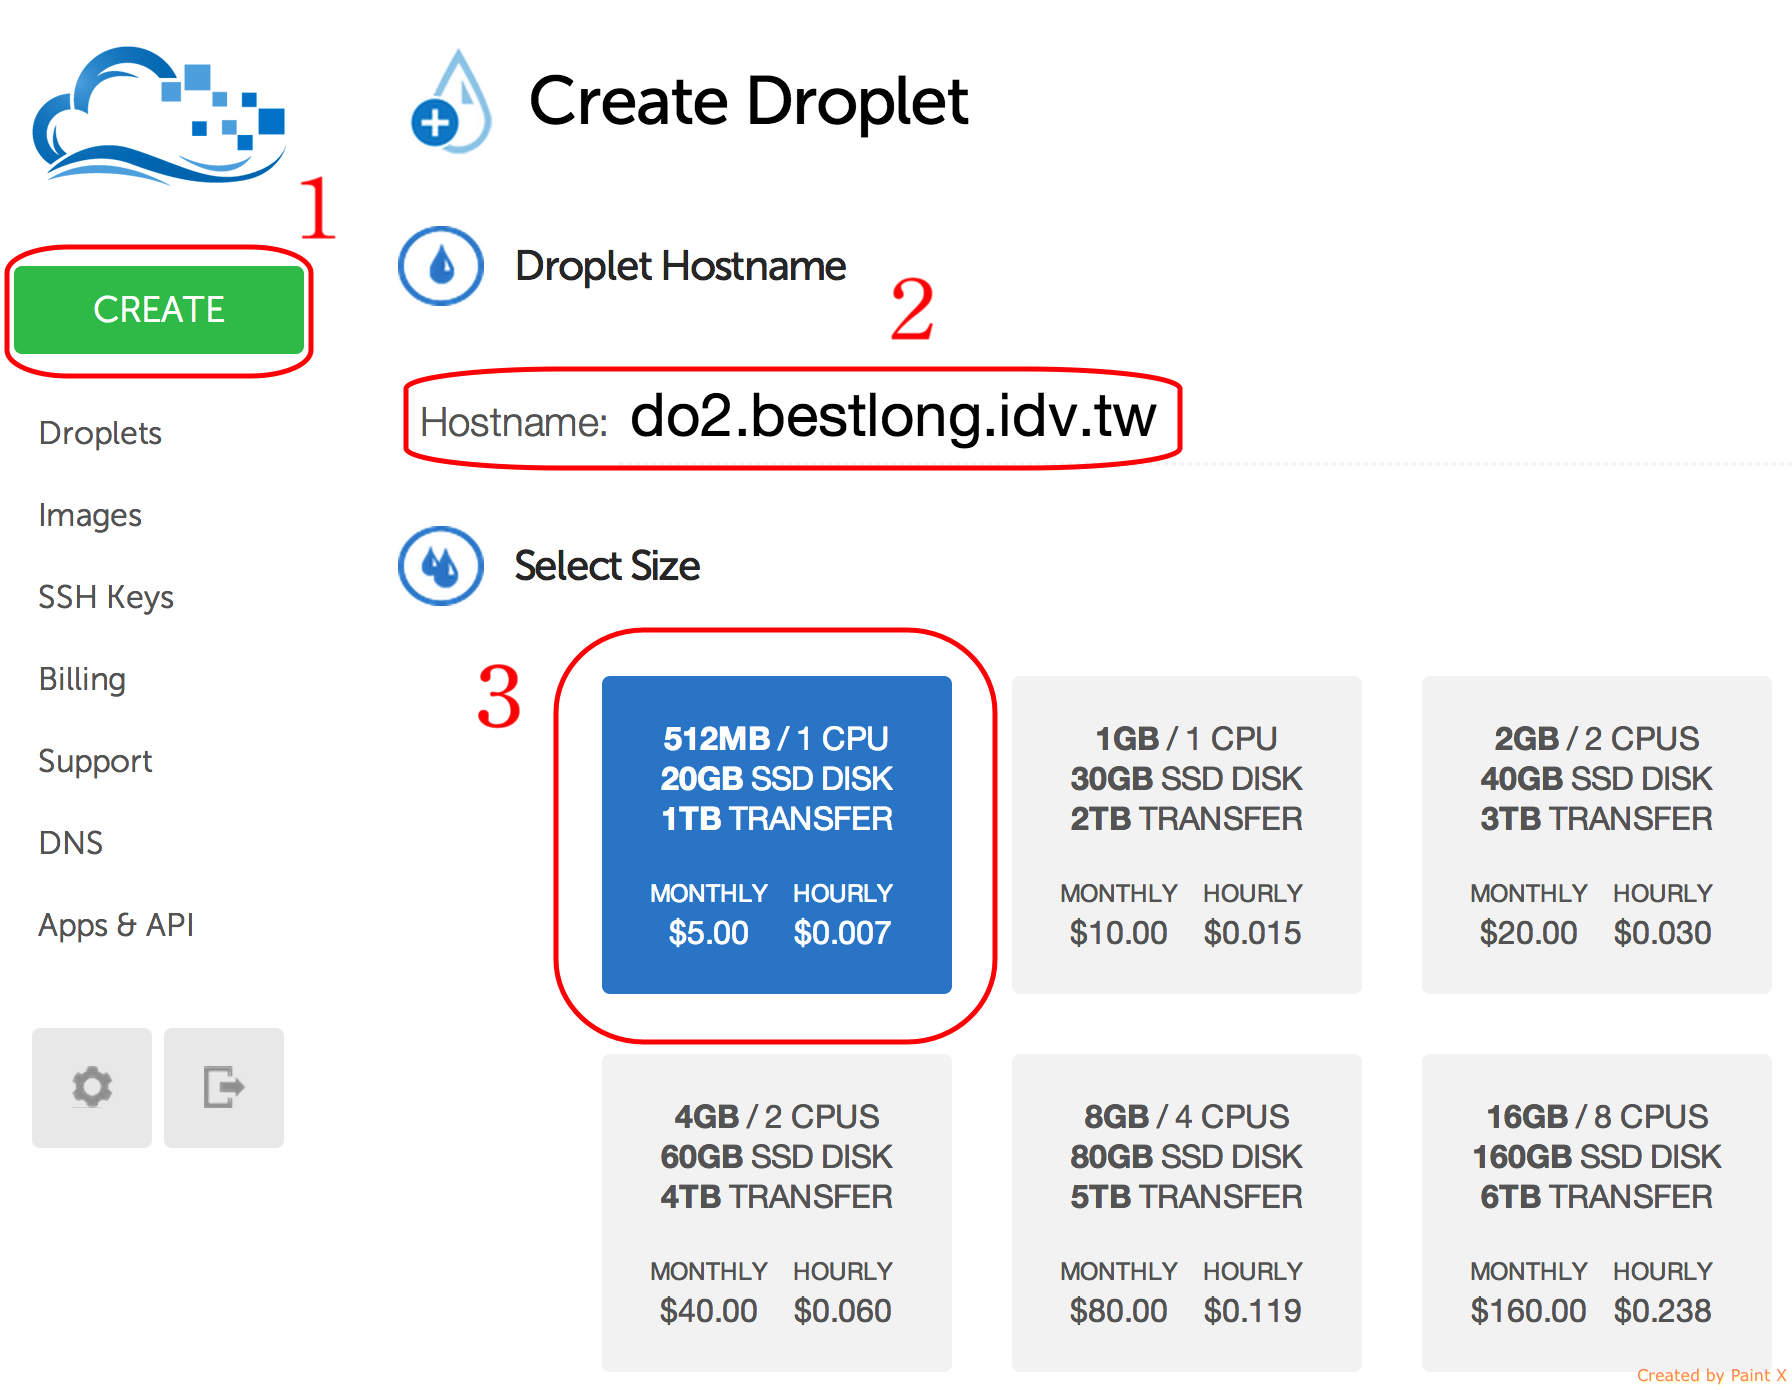
建立新主機可依下列圖示依序操作,點擊 Create 後輸入主機名稱然後選擇虛擬主機規格
然後選擇要放在哪個機房

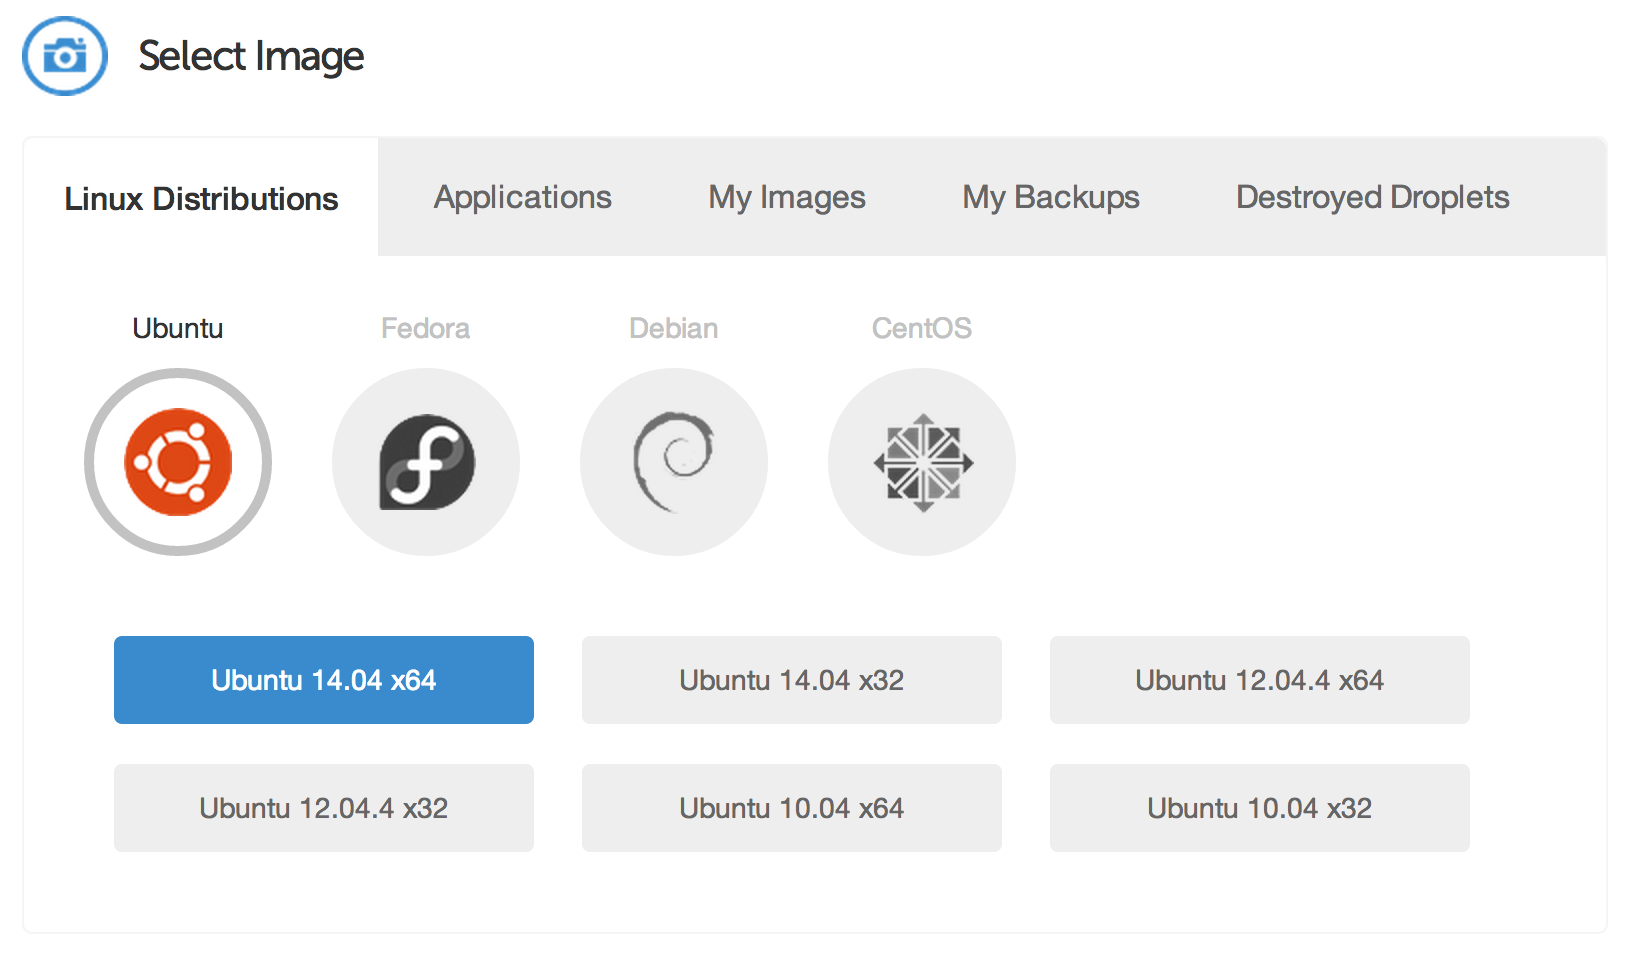
接著就是選擇要安裝何種系統,也可以選擇套裝系統安裝,或從備份擋來還原成新主機

最後就是點選 Create Droplet 然後系統就會開始依選擇的條件開始建立虛擬主機
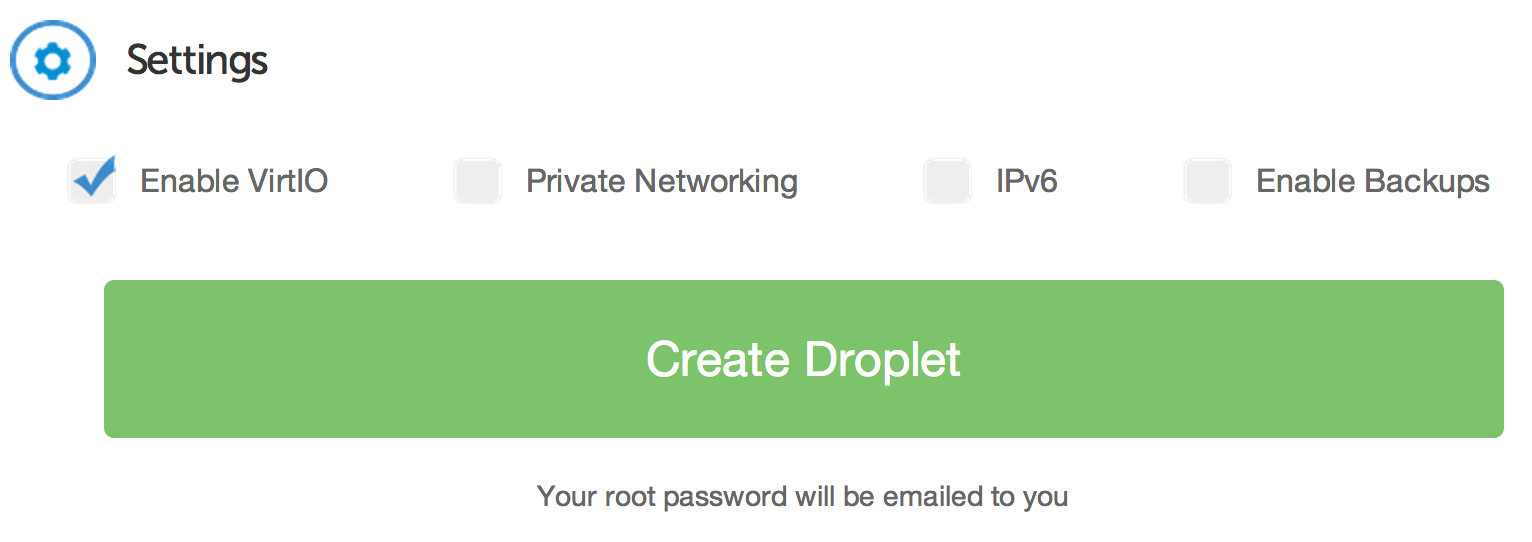
整個建立過程不到 5 分鐘,完成後系統會寄 mail 通知告知新主機的 ip 位址與 root 密碼,透過 ssh 連線首次登入就是修改密碼。
可以先嘗試一下重開機感受一下令很多人驚訝的速度,大概就 5 秒內就可以再次登入了,真的非常的快。
自己的 VPS 主機是選擇新加坡機房與 DigitalOcean 特調的 Ubuntu 14.04 x64 作業系統版本,剛開始只移轉 blog 過去,也碰到一些狀況,例如:網站會忽然無法連線,用 ssh 登入回應超級慢…等問題,都一一排除之後又陸續移轉其他服務,至今已上線快兩個月算是調整到可以穩定運作了,網頁回應的速度也比以往更順暢,也不必擔心停電或設備老舊故障等瑣碎事項,也算是資訊委外一種模式。
如果各位也想試用的話可以透過我的推薦連結去申請,可以讓我有機會加減省一些費用。